How to Sterilise Jars and Bottles – Wares of Knutsford
Posted by The Wares Team on 19th Jan 2023
Why should you sterilise glass jars and bottles?
All glass jars and bottles are manufactured in the glass factories and transported on sealed pallets to distributors like Wares of Knutsford and are then stored in a warehouse environment. Although to the naked eye the glass jars or bottles might appear clean, the presence of microscopic dust or bacteria is always a possibility and therefore you should always wash and sterilise glass jars and bottles if you intend to fill them with any kind of food or drink regardless of whether it is for personal consumption or for sale, this is also true for all caps.
There are three approaches to sterilising jars; in the oven, dishwasher or microwave. In all three cases you will need to wash your jars and lids first, removing any rubber seals or plastic caps before sterilising can begin. Note, sterilising should always take place simultaneously with cooking or preparing of food/drink so that you are filling your jars and bottles as soon as possible after sterilising.
Sterilising jars in the oven
- Wash your jars or bottles in the hot soapy water whilst your produce is being prepared.
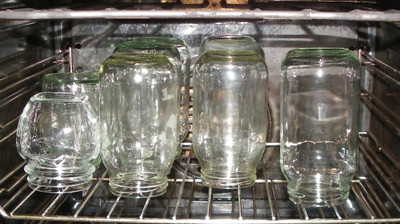
- Sit the clean jars and bottles upside down (or lying down for bottles) on a roasting tray to be put into the oven at 140 degrees centigrade. Leave the jars in the oven for a minimum of 20 minutes.
- At the same time, put your lids into a shallow pan of boiling water and simmer for 10 minutes before lifting them out of the water carefully (with tongs) and leave them face up on a clean tea towel or kitchen roll to dry (remember, the jars and lids need to be dry before they are used so you might need to set your lids aside to dry a little earlier in the process). Rubber seals can be treated in the same way i.e. for Le Parfait or clip top jars and plastic lids for bottles can be blanched briefly in boiling water and left to dry.
- Once setting point is reached or your product is ready to decant, you can remove the jars from the oven with gloves and allow to cool just a little while you finish off cooking.
- Transfer warm produce into the warm jars and pop on any rubber seals/lids. Your produce will typically last at least 6 months once sealed! You can even add a wax disc on top of your produce before sealing the lid, this can help keep the produce fresh, prevent pitting on the surface of your jam and help guarantee an airtight seal.
- Buy your wax discs here
Sterilising in the microwave
For a small number of jars, this can be a handy way of sterilising. Wash jars and rinse them before standing them upright in your microwave and microwaving them on full power for 60 seconds. Lids can be sterilising by submerging them in a pan of boiling water for 10 minutes. Use both straight away.
(541) How to Sterilize Jars using Microwave in 60 Seconds | Dietplan-101.com - YouTube
How to sterilise jars in a dishwasher
It is fine to use your dishwasher on a hot cycle to sterilise your jars or bottles but you need to remember that the dishwasher must be clean of food debris and on a hot cycle. Again, your jars and bottles for sterilising need time to dry before use but still be warm from the sterilising process. Lids should be simmered in a pan for 10 minutes and left to dry immediately before use.
How To Sterilize Jars In The Dishwasher | Greedy Gourmet
These same methods of jar and bottle sterilising can be used on larger jars such as clip jars, Kilner jars and Mason jars, often used for pickling and bottling or canning fruit, as well as smaller, everyday jam jars such as 1lb jam jars and 190ml panelled food jars typically used for chutneys, jams, marmalade and sauces.

