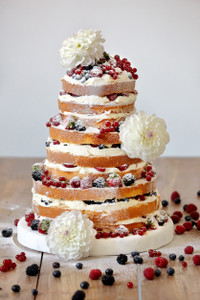
Get The Professional Look With A Naked Cake
Posted by The Wares Team on 4th Oct 2019
TV shows such as The Great British Bake Off and Masterchef have been inspiring
us all for quite a few years now to up our game when it comes to home baking
and creating our very own culinary masterpieces. It seems that every season, a
new series of one of the shows reveals to an enthusiastic audience the latest
hot new cooking trend - and currently, naked cakes are creating something of a
buzz. If you've never heard of a naked cake, don’t worry, we’ll explain
everything today and give you some great ideas for creating your first naked
cake at home.
So What Exactly Is A Naked Cake?
On the face of it, a naked cake sounds as though it might be a little dull.
After all, the ‘naked’ part suggests that the cake has been stripped of any
fancy toppings or decoration. In fact, nothing could be further from the truth
and a naked cake can be just as fancy and impressive as a traditionally
decorated cake.
What makes a naked cake ‘naked’ is the absence of that outer coating of
frosting or other topping, so that the individual layers and fillings of the
cake can be seen. These become part of the overall visual appeal of the cake.
When we say absence of frosting or cream on the outside, some naked cakes will
have just the gentlest hint of a smear of cream around the sides, provided that
the layers and fillings can still be seen. And if your naked cake has multiple
layers and fillings, so much the better - you’re right on trend!
So grab your cake baking equipment and baking tools and let’s take a look at a
naked cake recipe idea…
Vanilla Naked Cake Recipe
The key to getting the wow factor with a naked cake is to stack the sponges
high, preferably tiered in order of size. So, take a look through your baking
tools and cake baking equipment and fish out all of your cake tins. For this
recipe, you’ll need two 6 inch tins, two 8 inch tins and two 10 inch tins, all
spring-form. The ingredients are for the two 6 inch sponges, so you’ll need to
repeat this and increase the quantities for the other sizes.
Ingredients:
For the 6 inch sponges
- 150g butter, softened
- 200g caster sugar
- 1 vanilla pod
- 1 tsp vanilla extract
- 3 large eggs
- 240gm plain flour, sifted
- 1½tsp baking powder
- 4 tbsp hot water
For the filling (enough for all cakes)
- 850gm butter
- 900gm icing sugar
- 3tbsp vanilla extract
- 5 tbsp milk
- 2 jars of strawberry jam
For the syrup (enough for all cakes)
- 500gm caster sugar
- 500gm water
- Flavouring of your choice
Method
Preheat the oven to 180°C (160°C fan). Grease the cake tins lightly, and line with baking paper.
Beat together the butter, sugar, vanilla extract and the seeds from the vanilla pod for about 3 minutes, until the mixture is fluffy and light.
Beat the eggs in a jug and then add them slowly to the mixture, stirring them in as you go. Fold in the flour and baking powder slowly, mixing it as you go and adding a little hot water at the same time. Make sure the mixture is smooth and fully combined, without overworking it.
Pour into the cake tins and level off the tops. Bake for about 1 hour, or until a skewer pushed into the middle of the cake comes out clean. Remove the outer piece of the cake tins and transfer the cakes, still on the tin base, onto a wire rack to cool.
Repeat this process for the remaining tiers of cake, increasing the quantities of the ingredients proportionately, according to the size of the tins.
Once all cakes are cooked and cooled, make the buttercream by whisking the
butter to make it soft, then adding the icing sugar in two batches using a
spatula or wooden spoon to combine. Add the vanilla extract and whisk until
fluffed up and light. Add a little milk to make the buttercream easy to spread.
Set to the side, covered with cling film.
Take the base layer of cake and position it on a flat board. If the top is domed, cut it flat with a knife. Carefully cut the base cake in half to create two layers and then repeat with the next cake.
Brush all sides of the cut cakes with sugar syrup and allow time for it to soak in. Spread buttercream on a cake board and position the base layer on it, to stick it in place. Spread each layer with buttercream and jam, before putting them into place in the tier. Once all cakes are ready, stick 6-8 dowel rods in the base layer, and then push each layer into place over these dowels. It helps to assemble the cake where it is to be served, and the upper tiers should be supported by the dowels, and not rest on the lower tiers of cake.

